January 21, 2017

#mustreadin2017


Over the past few weeks I’ve seen many twitter and blog posts for #mustreadin2017 and I’ve decided to join the fun!  Hosted by Carrie Gelson of There’s a Book for That, I’m using my participation to motivate me to complete my must read book list throughout the year.  

There will be quarterly updates, so I'll be back in April to discuss my progress and create a new must read list.  To begin with, here’s my #mustreadin2017 to get me started in the new year:


The Challenge Continues . . . The 2015 Buckeye Book Award


And the reading challenge continues!  As stated in a previous post, my librarian friend Ashley Lambacher of the Book Talker and I are hosting the Buckeye Book Award Reading Challenge.  Our goal is to read all the past winners from the children’s book category in chronological order from 1982 to the present.  I will read the K-2 picture book winners and Ashley will read the 4-8/3-5 chapter book winners.  Today I continue my challenge by reading the winner of the K-2 Buckeye Book Award in 2015, The Day the Crayons Quit by Drew Daywalt and Oliver Jeffers.

Duncan’s crayons are not happy and they are on strike.  In their place they left a stack of letters detailing their grievances.  Yellow and orange want dibs on coloring the sun, while peach wants to know why his wrapper was torn off leaving him naked.  Beige is tired of being ignored next to brown, and blue is exhausted from overuse.  Pink wants to be used more explaining it’s not a color just for girls.  As the complaints pile up, Duncan figures out a solution by creating a colorful drawing that addresses all of the crayons issues.  Jeffers’ illustrations bring the crayons to life giving each wax tube detailed expressions and emotions.  My students really enjoy The Day the Crayons Quit and it’s follow up, The Day the Crayons Came Home, making it a notable winner for the Buckeye Book Award in 2015.

Ashley -  I know you and your students like the crayon books, and you’re a big fan of Oliver Jeffers.  Your upcoming 2015 book is Secrets According to Humphrey.  Do your students enjoy the Humphrey series as much as my students?  

Our reading challenge is almost over!  We only have one more book to read next month.  I’m sad to see our challenge end, but I’m proud of our commitment and collaboration.  

January 16, 2017

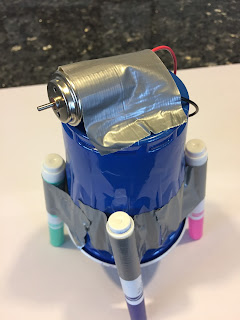
10 Steps to Make a Doodlebot


Creating a doodlebot is one of my student's favorite makerspace activities.  A doodlebot is a robot that is made from every day materials that draws, or doodles, on it's own.  Below are the materials and 10 steps to build a doodblebot.


You will need these supplies to make a doodlebot:
- a large Dixie cup
- 4 markers
- paper to draw on
- duct tape
- a AAA battery pack with exposed wires
- 2 AAA batteries
- a small motor
- red and black wire (with alligator clips or without alligator clips)
- a penny
- wire strippers
- soldering tools (optional)


Step #1 - After you've gathered your materials, tape paper to your table for the doodlebot to try on.


Step #2 - Use duct tape to secure four markers to the outside of an upside down Dixie cup.  Be sure they all at the same height and each marker can touch the ground when standing alone.


Step #3 - Get the motor wired.  You can find small motors at hobby stores or online.  My husband soldered the red and black wires to our motor, and soldered alligator clips to the ends.  If you can't solder, you can use wire strippers to expose the ends of the wires and fold them around both metal loop on the motor.  Or you can buy wires with alligator clips on both ends.  Students can clip one end of a red wire to one of the motor's loops, and clip one end of the black wire to the other motor's loop.  


Step #4 - Tape the motor to the top of the Dixie cup, making sure the spinning rod hangs well over the edge of the cup.  A weight will need to swing from this rod, so make sure there is ample room for it to swing without the top of the cup creating an obstruction.  


Step #5 - Prepare the battery source.  I recommend using a AAA battery pack instead of a AA battery pack.  I found the AA batteries to run too hot and I've seen it melt the cup - you don't want children to burn themselves!  You can find a AAA battery pack at hobby stores or online.  Make sure the ends of the wires are exposed.  If they aren't, use wire strippers to remove the tips from both the black and red wires.  Add the AAA batteries to the battery packs.  I've found that children need to be taught how to load batteries, so this step may need to be taught.  When the robot fails to draw, incorrect positioning of batteries is often a cause.


Step #6 - Tape the loaded battery pack behind the motor on the top of the Dixie cup.


Step #7 - Tape a penny to the motor's rod.  The penny will act as a weight to make the robot vibrate and dance it's way across the paper.  This is a tricky step so I included a video to show how it's done.  Make sure the secured penny can rotate around the rod without bumping into the top the cup.  If it bumps, then your motor will need to be repositioned to allow the penny to rotate without obstruction. 


Step #8 - Remove the caps from the bottom of the markers.


Step #9 - Turn on the doodlebot.  If you have wires with alligator clips, simply clip the motor wires to the exposed wires on the ends of the battery packs.  If you have wires without alligator clips, you'll need to twist the exposed wire ends of the motor to the exposed wire ends of the battery pack.  When turned on, the penny should begin to spin like a propeller.


Step #10 - Enjoy watching the doodlebot draw and scribble it's way across the page.  To turn the robot off, simply unhook the wire connections.  

When I ask my students to create a doodlebot, I give them all the materials and a picture of the end product.  Using the picture as a guide, the students need to figure out how to build the robot.  The penny can be the trickiest aspect of the doodlebot and the part I help students with the most.  I've used this activity successfully with students in grades 2nd-5th.  

I hope you found these instructions to make a doodlebot helpful.  If you have any questions, feel free to email me at jill.merkle@yahoo.com.  

January 1, 2017

My One Little Word for 2017


I love the “one little word” movement.  It’s the closest thing I get to making a new year’s resolution.  Last year, my one word was POSITIVE.  I can honestly say that it shaped my 2016 year.  I’m in a different place at the end of this year than I was at the end of last year.  

For 2017, my one little word is CATALYST.  I’m in a new school within a new district, so I’m attempting to make my mark as the school’s new teacher librarian.  So far, I’ve redesigned the library and introduced the staff, students, and parents to a school-wide cardboard challenge and hour of code.  For the remainder of the school year, I’ll continue my work as a catalyst for growth with the following:
  • I want to be a catalyst for new thinking and learning with the start of the school’s makerspace.
  • I want to be a catalyst for innovative ways to integrate technology and social media in the classroom for both staff and students.
  • I want to be a catalyst for increased access to books with a little free library for the school.
  • I want to be a catalyst for increased participation in summer reading with my unique and creative ways to promote reading over the summer months.
  • I want to a catalyst for participation in growth mindset for both staff and students.
A new job brings new opportunities, new opportunities to influence change.  I’m excited for the new year ahead and ready to act as a catalyst.